eIRB Submission Guide
Welcome to eIRB!
The purpose of this webpage is to provide supporting guidance and instruction for using WSU’s electronic IRB system. This guidance will be updated periodically as needed. A downloadable form of this guidance can be found on our forms page, see: eIRB Quick Start Guide
- If you are not connected to the WSU Wi-Fi, connect to the WSU VPN. Please see Global Protect VPN – Knowledge Base – Confluence for additional information.
- Allow pop-ups from https://myresearch.wsu.edu/compliance/irb/myprotocols.
- Go to https://myresearch.wsu.edu/compliance/irb/myprotocols
- Log in using your WSU credentials.
- Navigate to My Protocols.
- Hover over Compliance.
- Hover over IRB.
- Click on My Protocols.
- Click on the Create New Form dropdown.
- Click on IRB Protocol.


Selecting a Principal Investigator (PI)
Once you have navigated to the application, you must select a PI to enable saving the protocol. To add the PI, complete the following steps:
- Click on the Basic Information section on the left-side navigation pane.
- Navigate to the first subsection, “Principal Investigator (PI) Contact Information.”
- Type the PI’s last name in the red search box.Click the search icon.Click on “Select” next to the line with the correct PI information in the pop-up window. Note: pop-ups must be enabled from the website.
- Click the blue “Save” button at the bottom of the page.
- Navigate to the first subsection, “Principal Investigator (PI) Contact Information.”
The box should now appear green, and the PI’s first name and email address should be listed in the subsection.


Giving Editing Permissions to Key Personnel
If a study team member is completing this form on behalf of the PI, or would like to make edits to the protocol, this person must be added to the Key Personnel under the Personnel and Training section and provided with editing permissions.
Note: if a study team member other than the PI sets up a protocol on behalf of the PI, they must add themselves to the Key Personnel and give editing permissions before exiting the application. They will be locked out of the application if they do not complete this step, until the PI provides permissions to the individual.
To give editing permissions to a study team member other than the PI, please complete the following:
- Click on the Personnel and Training section on the left-side navigation pane.
- Navigate to the fourth subsection, “Other Key Personnel.”
- Click the “Add WSU Person” button.
- Select their role from the dropdown.
- Type the person’s last name or WSU ID in the red search box under “LAST NAME”.
- Click the search icon.
- Click on “Select” next to the line with the correct personnel information in the pop-up window. Note: pop-ups must be enabled from the website.
- Check the box next to “Can Edit Protocol.”
- Please check any other boxes as relevant. Note: Receives Notices will ensure this person is notified when additional materials and revisions are requested.
- Select a response under “DELEGATED BY PI TO OBTAIN SUBJECTS INFORMED CONSENT?”
- Click the button to “Add Person.”
- Click the blue “Save” button at the bottom of the page.
Note: For WSU personnel, a CITI training attachment is not required as this information is integrated into the system.
The Key Personnel should now appear in the Other Key Personnel subsection.
General Instructions
Please complete all sections of the application in the order they appear in. Some sections may be hidden and may only appear based on your selections in previous sections. If you cannot locate a section relevant to your project, please schedule a meeting with our staff for guided assistance with your application.
Incomplete sections are indicated with a red marker on the left of the page. Required fields are indicated with red on the left side of the required field. Some questions may ask you to select an option, incomplete responses for these are indicated with red around the radio button options.
Please write “N/A” if a field or question is not applicable to your study. If you are unsure how to respond, please reach out to irb@wsu.edu to schedule a meeting with our HRPP staff.
After you complete each section, please push the blue “Save” button, at the bottom of the page, before pushing the green “Next Section” button.

Supporting Documents
In addition to the questions asked in the application, you will need to upload any participant-facing materials for review. This may include, but is not limited to:
- Recruitment Materials (e.g., scripts, drafts, flyers, posters, etc.)
- Consent Materials (e.g., consent, assent, and parent permission scripts and forms)
- Tools & Measures (e.g., surveys, questionnaires, interview scripts, intervention stimuli, etc.)
- Letters of Support (when conducting research in-person at another institution)
- Translated Materials
If you do not include these materials in your initial submission, we will send it back to you with a request for the missing materials.
Sections
- Basic Information
- Personnel and Training
- Project Description
- Human Subjects Research Determination
- Project Funding and Engagement
- Conflict of Interest
- Reliance Agreement
- PI Determination of Risk
- Exempt Research Categories
- Expedited Review Categories
- Participants/Recruitment
- Consent
- Assent
- Parent/Guardian Permission
- HIPAA
- Data Collection Methods
- Data Management Plan
- Risk & Benefit
- PI Assurance
- Review & Submit
For additional information regarding the information we require in these sections, please email irb@wsu.edu to set up a meeting with our HRPP staff.
Submitting Your Application
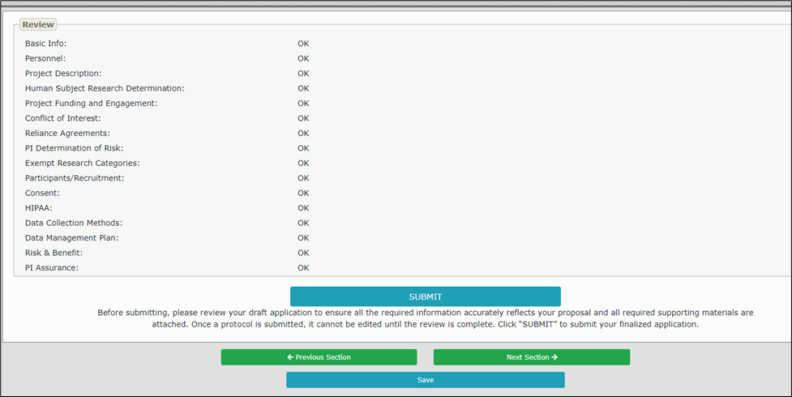
After completing all sections of the application, go to the “Review & Submit” section, indicated in the left navigation tab. All section headers in the navigation tab should appear without a red marker.
The status of the sections will appear in the “Review” subsection on the “Review & Submit” section. All sections should have “OK” indicated in the right column. If a section displays, “Missing Required Information,” please navigate to that section and review for any missing information or empty required fields.
Once you have ensured that the application is complete, click the blue “Submit” button at the bottom of the page.
All status changes will be sent to the PI and study team members that have been indicated to receive notifications via email. In addition to email correspondence, you may check the status of your application by completing the following steps:
- Navigate to My Protocols.
- Hover over Compliance.
- Hover over IRB.
- Click on My Protocols.
- Navigate to the appropriate tab in the upper left.
- The New/Pending tab is for applications not approved by the HRPP/IRB.
- The Approved tab is for protocols approved by the HRPP/IRB.
- The Expired/Inactive tab is for protocols that expired or had their status changed to inactive due to inactivity or a decision by the HRPP/IRB.
- Locate the protocol in the list. If you have many active projects, you may need to use Ctrl + f to locate the project by IRB# or title.
- The status will appear in the “Workflow Status” column of the table.

Note: This is a permanent action and cannot be undone.
If you wish to withdraw a submission from our review, please complete the following steps:
- Navigate to My Protocols.
- Hover over Compliance.
- Hover over IRB.
- Click on My Protocols.
- Ensure you are on the New/Pending tab.
- Locate the protocol in the list. If you have many active projects, you may need to use Ctrl + f to locate the project by IRB# or title.
- Click on the Action dropdown button.
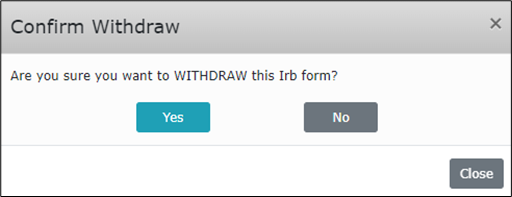
- Select Withdraw.
- A pop-up prompt should appear at the top of the screen.
- Select the blue “Yes” button to confirm your withdrawal of this protocol.

Note: This is a permanent action and cannot be undone. Deleting a draft is not the same as withdrawing a submission. This action is reserved for unsubmitted drafts.
If you wish to delete a draft from your protocols, prior to our review, please complete the following steps:
- Navigate to My Protocols.
- Hover over Compliance.
- Hover over IRB.
- Click on My Protocols.
- Ensure you are on the New/Pending tab.
- Locate the protocol in the list. If you have many active projects, you may need to use Ctrl + f to locate the project by IRB# or title.
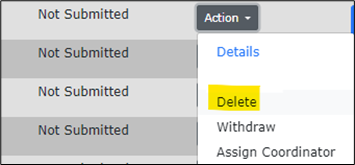
- Click on the Action dropdown button.
- Select Delete.
- A pop-up prompt should appear at the top of the screen.
- Select the blue “Yes” button to confirm your deletion of this protocol.
Submitting an Amendment
To submit an amendment to an already approved protocol, please complete the following steps:
- Navigate to My Protocols.
- Hover over Compliance.
- Hover over IRB.
- Click on My Protocols.
- Click on the “Approved” tab in the upper left to navigate to the list of approved protocols.
- Locate the protocol in the list. If you have many active projects, you may need to use Ctrl + f to locate the project by IRB# or title.
- Click on the Action dropdown button.
- Click on “Amend” from the selections.
- A pop-up prompt should appear at the top of the screen.
- Select the blue “Yes” button to confirm your amendment of this protocol.

Completing an Amendment
A new section, titled “Amendment” will appear at the top of the left-side navigation. Complete the Amendment section and click “Save” at the bottom of the screen. Please make changes directly to the corresponding sections of the application. Please upload any new and/or revised materials in their appropriate section of the application.
Submitting an Amendment
After completing all sections of the application, go to the “Review & Submit” section, indicated in the left navigation tab.
The status of the sections will appear in the “Review” subsection on the “Review & Submit” section. All sections should have “OK” indicated in the right column. If a section displays, “Missing Required Information,” please navigate to that section and review for any missing information or empty required fields. All section headers in the navigation tab on the left should appear without a red marker.
Once you have ensured that the amendment application is complete, click the blue “Submit” button at the bottom of the page.
You may review the project details of an approved protocol by completing the following steps:
- Navigate to My Protocols.
- Hover over Compliance.
- Hover over IRB.Click on My Protocols.
- Navigate to the Approved tab in the upper left tab selection.
- Locate the protocol in the list. If you have many active projects, you may need to use Ctrl + f to locate the project by IRB# or title.
- Click on the Action dropdown button.
- Click on “Details.”
- You will be redirected to a Details page with the project approval details.

- Pages may take a while to load, please wait at least 30 seconds before trying any buttons again.
- Ensure you are connected to the VPN.
- Ensure pop-ups are allowed.
- Try switching to a different web browser (e.g., Microsoft Edge, Google Chrome, Firefox, etc.).
- Exit out of the system, close your browser, and begin again.
For additional IRB/HRPP support, please contact irb@wsu.edu.
For additional technical support, please contact WSU ITS.